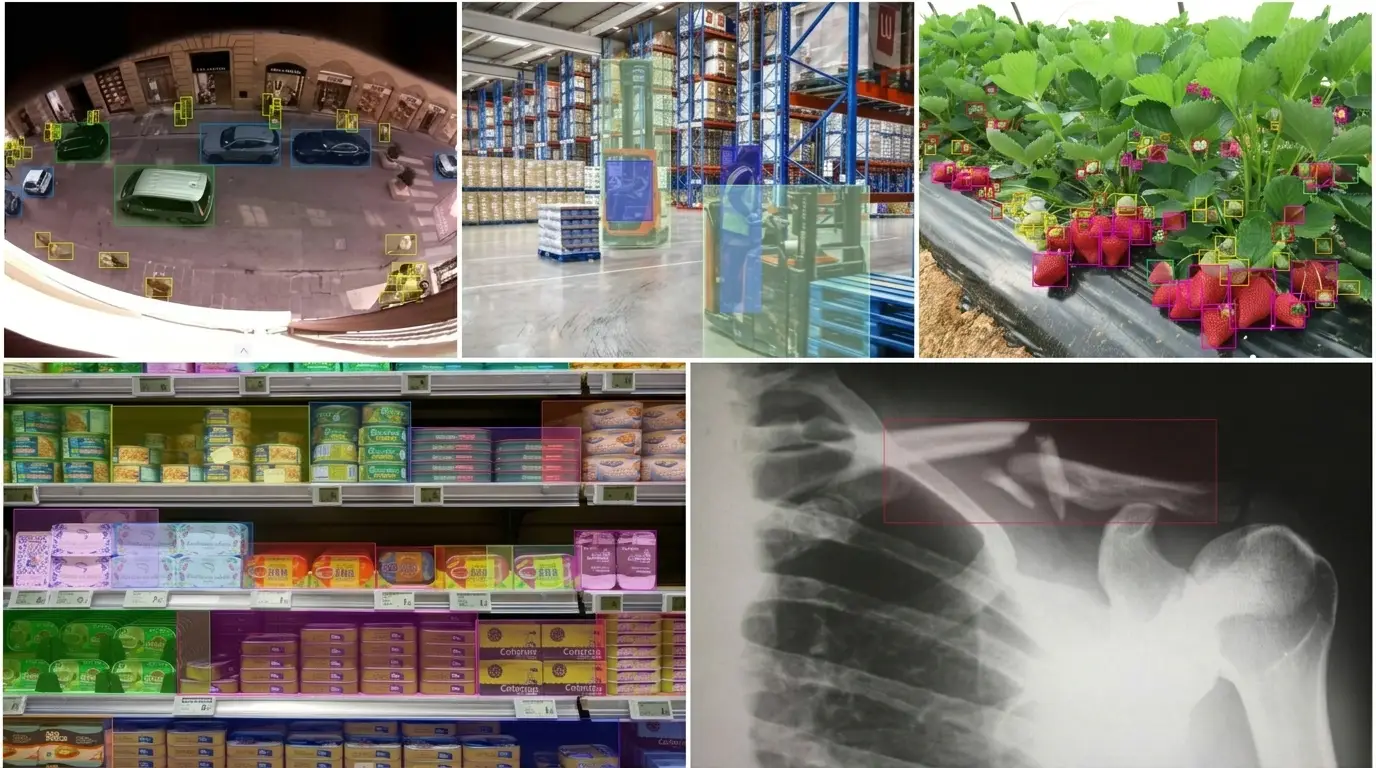
Object detection is one of the most widely deployed tasks in computer vision: identifying the presence, position, and nature of every object in an image, then delimiting its location using an annotated geometry. Behind every high-performing detection model lie thousands (sometimes millions) of images annotated according to precise, consistent rules. Image annotation for object detection is not about drawing boxes at random: it follows a structured methodology that directly determines the quality of the model trained on those data.
This tutorial covers each step of an image annotation project oriented toward detection, from class definition to the handling of occlusions and small objects, through to quality control. Teams that master these rules produce datasets that enable models to generalize correctly in production; those that overlook them accumulate systematic errors that are difficult to correct once the model has been trained.
Whether you are building a dataset from scratch or overseeing an external annotation provider, this guide gives you the operational reference points to drive every annotation decision with rigor. For a broader overview of the annotation process, from class definition all the way to model deployment, our
complete guide to image annotation for computer vision provides the conceptual foundations on which this tutorial builds.
What Object Detection Demands from Image Annotation
A detection model learns two things simultaneously from training data: how to localize objects within the image space, and how to classify them by type. During training, it receives for each image the list of annotated geometries, most often bounding boxes, that delimit each instance, paired with their class label. The quality of image annotation directly determines two model capabilities: localization accuracy (are predictions spatially close to the ground truth?) and classification accuracy (will the model confuse neighboring classes?).
The difference from an image classification task is fundamental. In classification, a single label describes the entire image. In detection, each object receives its own annotation, with its position and its class. Image annotation for detection therefore requires the annotator to make decisions at two levels simultaneously: “What is this object?” and “Exactly where is it?”.
This dual requirement makes annotation guideline writing particularly critical. Class ambiguities and vague geometry positioning rules translate directly into inter-annotator variance, then into noise in the dataset. A detector trained on noisy data learns to produce uncertain predictions, and its real-world performance in production falls short of its validation results.
Object detection also imposes a density constraint. Some images require dozens of instances to be annotated, each with its own geometry and class label, including partially visible or very small objects. Each omitted instance becomes a systematic false negative in the model evaluation. This is why annotation rules must define explicitly what must be annotated and what can be left out, with no gray area.
Step 1 – Defining Classes: The Foundation of Any Image Annotation for Detection
The first decision to make before annotating a single image is the definition of the class ontology. This step is often underestimated, yet it is the one that most strongly determines the final value of the dataset.
How many classes to define?
The temptation is often to define overly fine-grained classes, hoping that a highly discriminating model will deliver greater business value. In practice, multiplying classes without having enough examples for each leads to models that are unreliable on underrepresented classes. The basic rule: each class must have at least several hundred annotated instances in the training dataset for a detector to begin to generalize correctly. For rare classes, the question is not whether to remove them, but how to plan their collection before the annotation budget has been spent on other images.
The ontology granularity must also match the actual business requirement. A detection model deployed to trigger a security alert does not need to distinguish ten subtypes of vehicles: two or three classes will suffice and will be learned much more reliably. Conversely, an automated sorting model that must route products to different lines based on their exact reference justifies a more granular ontology, provided the dataset is sized accordingly.
Naming and delimiting each class without ambiguity
A class name is only a starting point. What matters is the written definition in the guidelines: what belongs to this class, and what does not? Two classes with overlapping definitions generate confusion among annotators and noise in the dataset. The boundary between “car” and “light vehicle,” between “scratch” and “surface mark,” between “adult” and “teenager,” is not self-evident without an explicit definition.
Each class should be accompanied by positive and negative visual examples in the guidelines. The most frequent edge cases (partially visible objects, ambiguous-class objects, unusual color or shape variants) must be resolved before production begins, not during it. A decision made collectively at guideline-writing time is worth far more than ten contradictory decisions made individually by annotators during production.
Managing rare and imbalanced classes
Class imbalance is one of the most common problems in image annotation for detection. When one class accounts for 95% of instances and another for only 1%, the model tends to ignore the minority class, because ignoring it reduces its global error without impacting performance on the dominant class. Yet in many industrial or safety contexts, the rare classes are precisely those with the greatest operational value: the defect to detect, the dangerous object, the anomaly.
Two complementary strategies help mitigate this imbalance. The first involves orienting image collection toward scenes that contain instances of rare classes, before annotation begins. The second uses targeted data augmentation techniques after annotation: cropping, affine transformations, image mixing. These two approaches do not substitute for one another: they are complementary and must be planned from the dataset design phase.
Step 2 – Choosing the Right Image Annotation Geometry for Detection
The choice of annotation geometry determines both the precision of the dataset and the cost of production. For object detection, several geometry types are available, each with its own advantages and constraints.
The bounding box, the standard for object detection
The bounding box remains the most widely used geometry in image annotation for detection, for a simple reason: the most common detection architectures were designed to predict axis-aligned rectangular bounding boxes. YOLO in its various versions, Faster R-CNN, DETR, and their many derivatives all output bounding box coordinates. The bounding box offers the best trade-off between localization accuracy and annotation speed.
The tightness rule is fundamental: a bounding box must be as tight as possible around the visible object, without clipping pixels that belong to it. A box that is too wide includes background noise that blurs the learning signal; a box that is too tight crops the object and the model learns an incomplete representation. Guidelines must explicitly state whether parts masked by occlusion should be included in the box or not, as annotators will not naturally converge on the same rule.
Oriented bounding boxes for inclined objects
When objects appear at various orientations in an image and a standard rectangular bounding box would enclose significant background, oriented bounding boxes (OBBs) offer more precise localization. Used notably in aerial and satellite imagery to delimit aircraft on a tarmac, angled parked vehicles, or obliquely oriented buildings, they allow the box to align with the object’s actual axis rather than with the horizontal. Their annotation is slower and requires tools that explicitly support this geometry.
When the polygon replaces the box
For certain detection applications, the required localization precision exceeds what a bounding box can offer. Instance segmentation, which delimits an object at the pixel level via a polygon or mask, is then preferred. This approach is suited for irregularly shaped or highly elongated objects, for fine surface defects in industrial applications, or for contexts where the exact shape of the object (rather than just its position) is exploited by a downstream process. It multiplies annotation time significantly, however, and is only justified when pixel-level precision actually adds value to the model or application.
Step 3 – Annotating Occlusions: The Golden Rule of Image Annotation for Detection
Occlusions represent one of the most frequent and most poorly handled challenges in image annotation for detection. An object is said to be occluded when part of its surface is hidden by another object (inter-object occlusion) or by the image border (truncation). Poorly managed, occlusions introduce massive inconsistency into the dataset: similar objects are sometimes annotated, sometimes ignored, depending on each annotator’s individual interpretation.
Defining a visibility threshold
The first decision to write into the guidelines is a minimum visibility threshold for an object to be annotated. The most common standard in object detection is to annotate any object whose at least 20 to 30% of the surface is visible within the image frame, and to ignore objects whose visible portion falls below this threshold. This figure may vary by context: for person detection in security environments, annotating an object with only 10% visibility may be appropriate if even a partial silhouette triggers an alert. For industrial objects where shape is critical, a 50% threshold may be more suitable.
This threshold must be explicitly written into the guidelines, accompanied by visual examples for borderline cases. The absence of a written rule leads each annotator to decide individually on cases that the guidelines should have resolved, generating considerable variance on partially visible objects, precisely those that are most difficult for the model to detect.
Managing truncation and occlusion attributes
Beyond the visibility threshold, many projects use attributes to qualify the degree of occlusion of each annotated instance. A binary attribute (occluded / not occluded) or a graduated one (low / moderate / heavy occlusion) allows the model to learn to weight prediction confidence according to object visibility, and enables the evaluation team to isolate difficult cases in performance metrics.
These attributes are particularly valuable for detection projects in dense environments: logistics warehouses, street scenes, industrial conveyors, where objects frequently overlap. They also allow, in post-processing, an analysis of model errors by occlusion level, directing data collection efforts where the model struggles most.
Handling stacked objects and truncation
Truncation occurs when an object is partially outside the image frame. The most common rule: annotate the visible part with a bounding box adjusted precisely to what is visible, without extrapolating the out-of-frame portion. A “truncated” attribute can be added to inform the model that the object is incomplete, helping it learn to predict even in this case.
For stacked or touching objects, guidelines must determine whether each instance is annotated separately (the standard for detecting distinct instances) or whether a group can be treated as a single annotation. The latter is only acceptable if the model does not need to count or distinguish individual instances within the group. In logistics or automated sorting contexts, where counting units is often an explicit objective, each instance must be annotated separately regardless of image density.
Step 4 – Small Objects: The Core Challenge of Image Annotation
Small object detection is recognized as one of the major difficulties in computer vision. In the MS COCO benchmark, the international reference for evaluating detection models, a “small object” is defined as having a surface area smaller than 32×32 pixels in the input image. Even the best-performing current detection models see their scores drop significantly on this category compared to their results on medium and large objects.
An operational definition of a small object
In practice, the definition of a “small object” depends on the business context and the resolution of the images being used. For a parking lot surveillance project filmed by a high-mounted camera, a pedestrian 15 pixels tall is small. For an industrial quality control project using macro-photography, a 10-pixel defect may correspond to a physically significant anomaly of several millimeters. “Small” is always relative to the image, not to the actual physical size of the object.
Before starting image annotation, it is useful to define explicitly in the guidelines what “small” means in the project context, so annotators know how far down in detail to go. A definition based on a surface area threshold (in square pixels) is more precise than a subjective definition (“objects that are hard to see”), because it is verifiable and can be applied consistently across the team.
Annotation rules specific to small objects
Small objects raise several practical issues during image annotation. Their precise delimitation by a bounding box is difficult without sufficient zoom in the annotation tool: a zoom factor of at least 8x is recommended for objects smaller than 20 pixels. Their classification is often ambiguous due to the low level of visible detail. Their density in some images, such as dozens of small objects in aerial scenes or bulk-parts images, significantly increases annotation time per image.
Several practical rules apply. The annotation tool must support sufficient zoom to allow precise delimitation of small objects. Annotators must be instructed to annotate systematically every object meeting the class definition, regardless of apparent size, unless the guidelines set an explicit minimum size. The temptation to skip small objects to save time is predictable and must be addressed through clear guidelines and quality checks specifically targeting small-object instances. Calibration sessions focused on small objects, with collective correction of disputed cases, align annotator practices before full production begins.
Covering small objects in the dataset
Small objects are often underrepresented in a dataset assembled without deliberate control, particularly because the images that contain the most of them are those taken at long distance or with a wide field of view. For a model to reliably detect small objects, it must have seen a sufficient number of them in diverse contexts: varying lighting, heterogeneous backgrounds, different degrees of occlusion.
The dataset design phase should include an explicit check of the size distribution of annotated objects, either through statistics (bounding box surface area distribution) or visualizations. If small objects account for less than 15 to 20% of total instances while they are present in real-world scenes, targeted supplementary collection is required before training the model. Correcting a coverage imbalance after annotation is costly; anticipating it during collection is far more efficient.
Step 5 – Quality Control of Image Annotation for Detection
A rigorous quality control process is inseparable from reliable image annotation for detection. Unlike classification tasks where the error is binary (correct or incorrect label), the quality of a detection annotation is graduated: a bounding box can be correctly classified but poorly positioned, or correctly positioned but assigned the wrong class. These two error types have different effects on the model and must be measured separately.
IoU as the central metric
Intersection over Union (IoU) is the reference metric for measuring the positional quality of a bounding box. It calculates the ratio between the intersection area and the union area of the annotated box and the reference box. An IoU above 0.7 is generally considered a well-positioned annotation; an IoU below 0.5 signals an unacceptable positional deviation. In quality control, IoU is calculated between production annotations and a gold standard made up of expert-validated annotations. Images whose average IoU falls below the defined threshold are sent back for correction to the annotator responsible.
Mean Average Precision (mAP) calculated on the validation annotations provides a more global view of dataset quality, integrating both localization precision and classification accuracy. Tracking this metric throughout production, not just at final delivery, allows early detection of quality drift.
Gold standards and double checking in production
A gold standard is a set of images annotated by experts, whose annotations serve as a reference for measuring the quality of production annotators. Inserting gold standard images into production batches, at a rate of 2 to 5% of the total volume, allows real-time detection of quality drift, without waiting for a full batch to be completed before auditing. When an annotator scores below threshold on gold images, their annotations from the corresponding period can be targeted for an enhanced audit.
Double checking, where each annotation is reviewed by an independent controller before delivery, complements this setup. For projects with high requirements (object detection in safety systems or medical contexts), 100% verification of production annotations is recommended. A documented disagreement resolution process between annotator and controller ensures that final decisions are always made according to the guidelines, rather than according to the individual judgment of the controller.
Pitfalls to Avoid in Image Annotation for Detection
Several recurring errors degrade the quality of detection datasets, sometimes in ways that are not visible until the model has been trained. Identifying them in advance allows them to be addressed through guideline rules rather than through costly corrections after the fact.
The first pitfall is boxes that are too wide. When annotators draw bounding boxes that include context beyond the object (background, adjacent objects, safety margins), the model learns to associate the class with that context rather than with the object itself. It becomes context-dependent for classification, and its performance drops as soon as the object appears in an environment different from the training dataset. This problem is particularly common with elongated or irregularly shaped objects, where annotators sometimes draw a wide box out of caution.
The second pitfall is confusion between similar classes. In any image annotation project involving visually similar classes, annotators may hesitate and assign instances to the wrong class. This is predictable and is resolved through precise guidelines, illustrated edge-case examples, and regular calibration sessions at the start of each new batch. A high confusion rate between two specific classes is a signal that their definition in the guidelines needs to be sharpened.
The third pitfall is the systematic omission of small objects. When guidelines do not explicitly state that small objects must be annotated, some annotators skip them, considering them too small to be relevant. This omission biases the model significantly: it never sees small objects during training, and therefore produces systematic false negatives for those instances at inference time.
The fourth pitfall is the absence of rules for ambiguous objects (partially visible, blurred, backlit, or of uncertain class). Without explicit rules, each annotator resolves individually cases that the guidelines should have anticipated. These individual decisions create dataset inconsistencies that are hard to quantify and costly to fix after the fact. An imperfect but homogeneous rule always outperforms the absence of a rule, which leaves the dataset heterogeneous.
Outsourcing Image Annotation for Detection: The Key Criteria
Image annotation for detection often represents a substantial volume of work that is difficult for data science or R&D teams to absorb in-house, given that their core focus is modeling. Outsourcing enables scaling annotation production without hiring or training a dedicated internal team. However, it requires choosing a provider capable of understanding the business stakes of the project, not just executing instructions.
The ability to handle complex taxonomies is the first filter. A detection project typically involves several dozen classes, multiple attributes per instance (occlusion, truncation, visibility level), and non-standard edge cases that guidelines cannot fully anticipate. The provider must be able to escalate disputed cases quickly, update guidelines during production, and maintain consistency with past annotations whenever a guideline is revised.
The rigor of the quality process is the second criterion. How are annotations verified? How frequently? Using which metrics? A serious provider must be able to deliver quality reports per batch, with metrics such as IoU scores or conformance rates against gold standards. The level of control must be adjustable to project requirements: 25% sampling is sufficient for standard projects; 100% verification may be necessary for high-stakes applications.
Data security is a third non-negotiable point. Production images often contain sensitive information: personal data on individuals captured on camera, intellectual property relating to products or industrial processes, confidential infrastructure data. Verifying the provider’s certifications (ISO 27001, GDPR compliance), network security practices, and data hosting model is essential before transferring any dataset.
Finally, operational responsiveness in the event of a question or a guideline update determines how smoothly the project runs over time. An image annotation project for detection always evolves: classes are added, rules are refined, unforeseen cases arise. A dedicated, available, and responsive technical contact is an operational asset as much as a quality criterion.
For more information on 2D and 3D annotation services for computer vision, visit the
Infoscribe AI annotation page, which details the types of projects handled and the modalities of engagement.
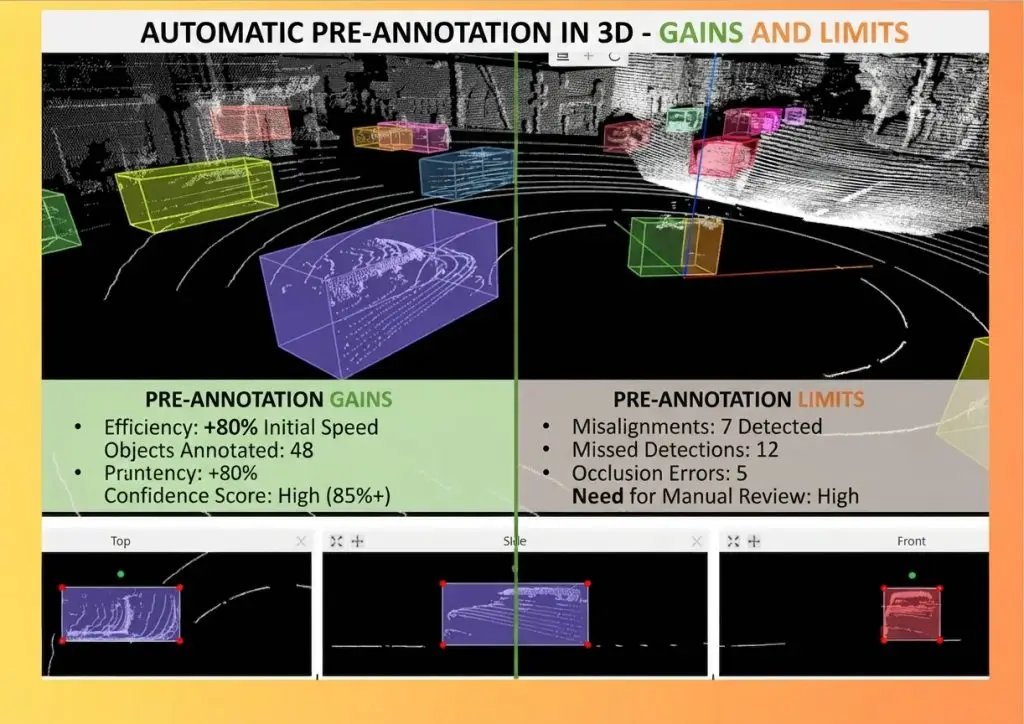
Three-dimensional object detection, via the annotation of LiDAR point clouds, raises complementary challenges to those covered in this tutorial. If your project combines 3D sensors with cameras, you will find detailed coverage of these specificities in our article on
LiDAR point cloud annotation and the transition from 2D to 3D.
Building an Image Annotation Methodology for Detection That Holds in Production
Image annotation for object detection is a discipline in its own right, requiring a structured methodology at every step: ontology design, geometry selection, occlusion management, small object handling, and ongoing quality control. These decisions cannot be made lightly or delegated without a precise framework: they directly determine the model’s ability to generalize under real-world conditions.
Teams that invest in annotation quality, through precise guidelines, regular annotator calibration, and systematic quality metrics, produce datasets that enable reliable, maintainable models to be trained. Those that neglect this phase find themselves correcting systematic errors long after annotation has been completed, typically at a cost that exceeds what rigorous methodology would have required from the start.
If you would like to discuss the specificities of your detection project and get practical feedback on your annotation setup,
reach out to the Infoscribe AI team to connect with our technical specialists.